Ro Water Filter System

Author name: Admin

Reverse osmosis water for fish tank with healthy aquarium plants and fish supported by RO filtration system
Reverse Osmosis, Installation

Why Reverse Osmosis Water For Fish Tank Is Essential for Healthy Fish

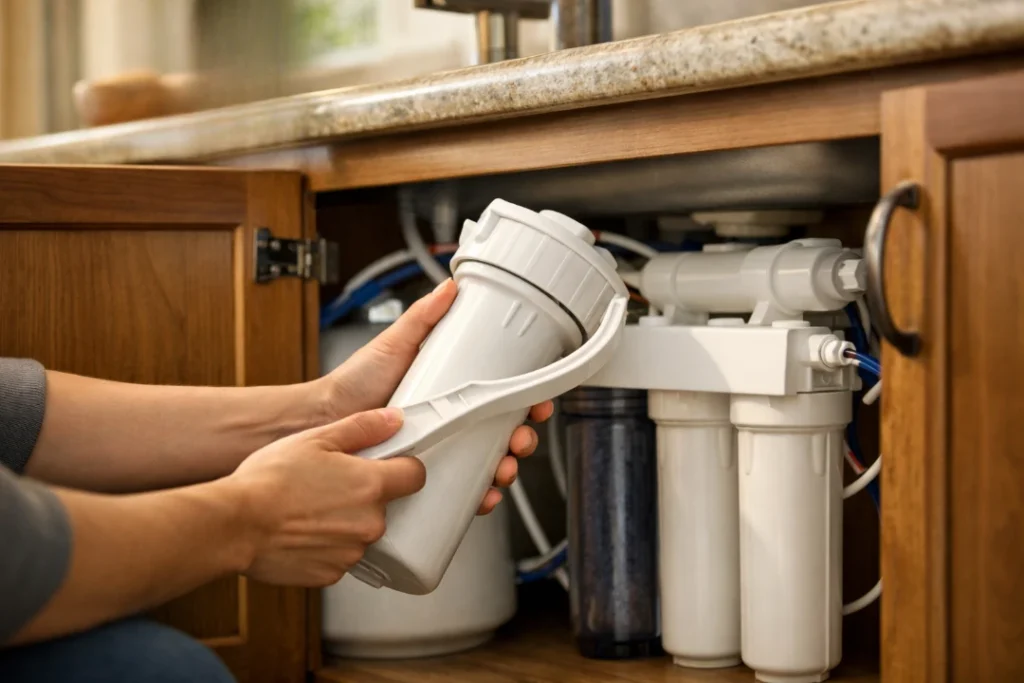
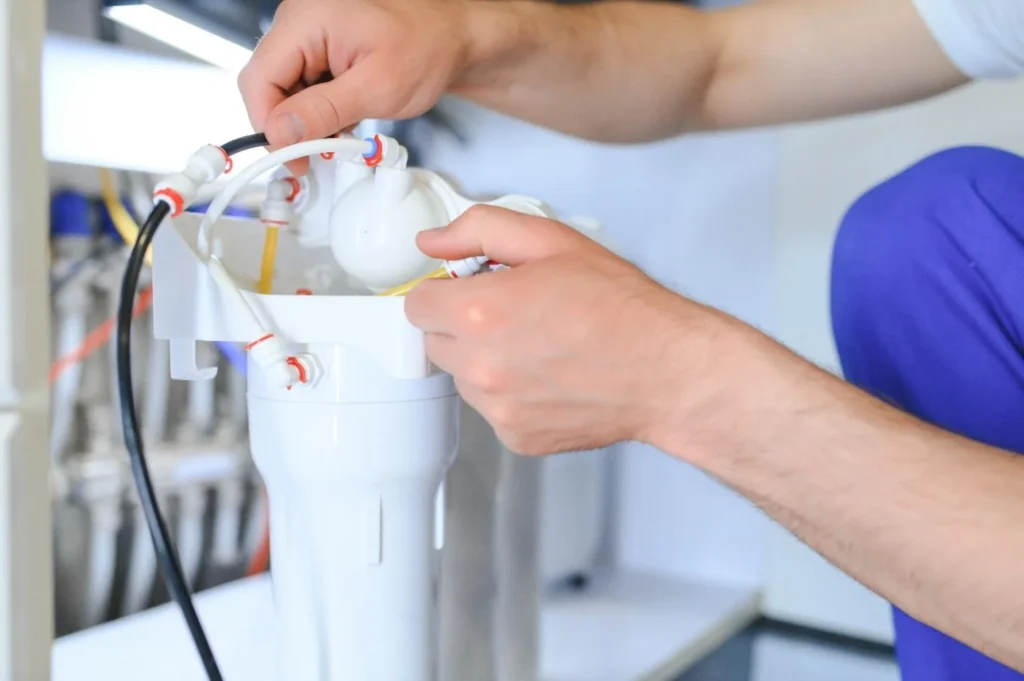
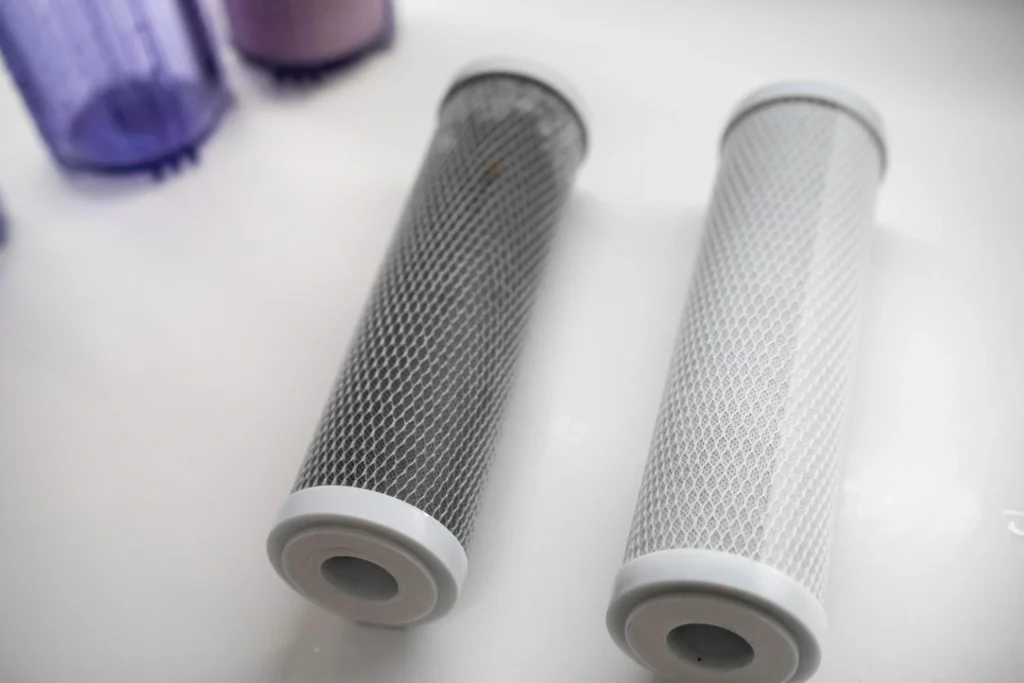
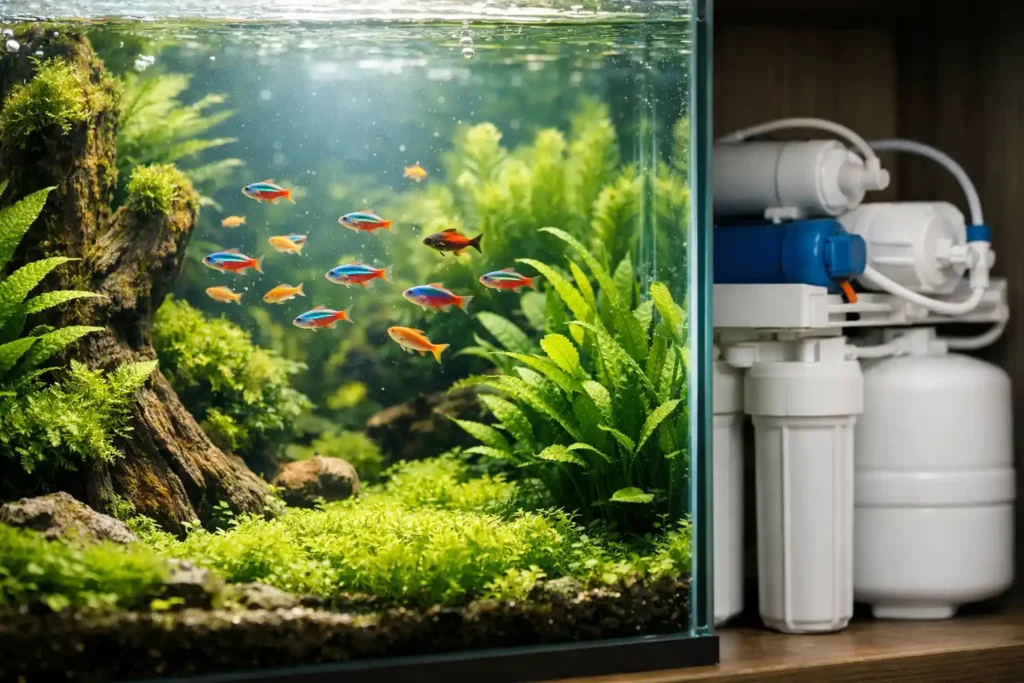
Reverse osmosis water is essential for healthy fish because tap water contains chlorine, heavy metals, and phosphates that silently stress and kill fish over time. RO filtration removes all of it, giving you a clean, controlled starting point that sensitive species actually need to survive and thrive. These levels meet the standards for human drinking water, but fish are more sensitive to what is dissolved in their water. Reverse osmosis water for fish tank setups strips those contaminants out completely, giving you a clean, neutral baseline you can build on. At RO Water Filter System, we work with homeowners and aquarium hobbyists in Tracy and the surrounding areas to find the right filtration solution for exactly this kind of situation. What Is Wrong with Tap Water for Aquariums Most people assume that water safe for humans is safe for fish. That is not quite right. The water that comes from the city is treated to remove germs and make sure it meets public health requirements. Chlorine or chloramines are used in such treatment. These chemicals are meant to kill germs, and they do the same thing to fish gills when they are in tank water. Chloramines don’t off-gas as free chlorine does, even when you let tap water soak overnight. You need a dechlorinate, but even then, the water still has everything else in it. Here is what else Tracy tap water is likely carrying: Dissolved minerals (calcium, magnesium, sodium) that push general hardness (GH) and carbonate hardness (KH) well above what many tropical species can tolerate Heavy metals like copper and lead, which can leach from older plumbing and are lethal to invertebrates even in tiny amounts Phosphates, sometimes added by municipalities as corrosion inhibitors, which fuel algae blooms almost immediately Silicates, which cause brown diatom algae to coat glass, equipment, and substrate Nitrates, already present in some tap water before your tank even produces any biological waste Central Valley tap water contains total dissolved solids (TDS) at levels well over 300 parts per million, which is harmful for discus fish such as discus, wild-type bettas and soft water tetras; for shrimp and reef corals however it could prove fatal. How Reverse Osmosis Water For Fish Tank Works and Why It Is the Right Starting Point Reverse osmosis uses pressure to force tap water through a semi-permeable membrane with pores small enough to filter out almost everything except water molecules. Most ro systems designed for home use include several stages: Sediment pre-filter to catch sand, rust, and particulate Carbon block filter to remove chlorine and chloramines that would otherwise damage the RO membrane The RO membrane itself, which handles the heavy lifting and removes 90 to 99 percent of dissolved contaminants Post-carbon polishing filter for final cleanup before the water reaches your collection container A 5-Stage Water Filtration System adds an additional stage that provides even greater protection, making it a better long-term choice for aquarists who do regular water changes or have a larger tank setup. The result is what aquarists call a blank slate. Pure water that carries no assumptions. You decide what goes back in based on what your fish actually need. Why Aquarium Owners Specifically Benefit from RO Water Freshwater Aquariums For most freshwater tanks, the biggest win with RO water is control over pH and hardness. Tropical fish from South American river systems, like discus, cardinal tetras, and most dwarf cichlids, come from naturally soft, acidic blackwater environments. Their wild-type water has a TDS often below 50 ppm and a pH between 5.5 and 6.5. Tracy tap water is the opposite of that. With reverse osmosis water, you start at near-zero TDS and add back only what your fish need using a demineralizing product. Saltwater and Reef Aquariums In a reef tank, tap water is not a workable starting point at all. Marine salt mixes are formulated to dissolve in pure water and produce a specific elemental balance. When you mix salt into tap water that already contains calcium, magnesium, phosphates, and nitrates, the chemistry becomes unpredictable. You end up with levels you did not intend and cannot trace back to their source. Reverse osmosis water for aquarium salt mixing gives you a controlled foundation. Phosphates, which trigger aggressive algae at levels as low as 0.2 ppm, are absent. Silicates that smother coral and create diatom blooms are gone. Breeders and Sensitive Species Fish breeders working with species that only spawn in specific water conditions depend on RO water to trigger breeding behavior. Many cichlids, killifish, and soft-water tetras will not successfully reproduce unless the pH, GH, and KH are within a narrow band. You cannot reliably hit that band with untreated tap water because the mineral content of municipal water shifts with the seasons, rainfall, and treatment changes. With an ro system for fish tank breeding setups, those parameters stay consistent every time. The One Thing You Must Do After Using RO Water RO water is not plug-and-play for fish. Because it removes everything, including beneficial minerals, you must remineralize it before adding fish. Pure RO water lacks any buffering capacity to tame its pH fluctuations quickly and stabilize your biological filter in your tank, potentially stressing fish and disrupting biological filter performance. For freshwater tanks, dedicated GH and KH additives may help bring mineral levels up to what your species requires. TDS meters provide a simple means of verifying whether or not an RO system is producing water of sufficient purity for use, with readings under 10ppm before remineralization being the ideal goal. After reconstitution and reconsolidation have occurred, test again using an appropriate liquid test kit to make sure GH, KH and pH levels match. How RO Water Compares with Tap Water and Other Options Water Source Removes Contaminants Suitable for Sensitive Species Control Over Chemistry Tap Water Partial (depends on treatment) Limited Low Filtered Tap (Carbon only) Removes chlorine, some organics Limited Low-Medium RO Water High Excellent High Distilled Water High Good Moderate (no remineralization options) Deionized Water High

Reverse osmosis water filter replacement under kitchen sink changing RO cartridge
Installation, Reverse Osmosis

The Complete Guide to Reverse Osmosis Water Filter Replacement: Protect Your Family’s Health

You bought a reverse osmosis system to protect your family from lead, fluoride, chlorine, and other contaminants in your tap water. But here is the part most people overlook: the system only works as well as its filters. When those filters are overdue for a change, your water quality drops, sometimes without any obvious warning signs. Staying on top of reverse osmosis water filter replacement is the single most important maintenance task for RO Water Filter System. Most other tutorials on this subject offer you a broad timetable and leave it at that. They don’t explain what really occurs when a filter becomes blocked, why Tracy’s water conditions are important, or how to prevent the blunders that make your system last less long. This book accomplishes all of that and provides you with a clear, doable strategy you can start using right now. Why Reverse Osmosis Water Filter Replacement Is Not Optional An RO system contains many steps that filter the water in order. Every stage captures something else. When one step quits working, the others have to work harder, and the things you were filtering out start to get through again. Your sediment pre-filter is like the first line of defense. It prevents dirt, corrosion, and other small particles from getting to the sensitive RO membrane. If that pre-filter clogs and you ignore it, water pressure drops across the whole system. Your RO membrane, which is the most expensive component, has to work harder. Over time, it degrades faster than it should. This makes timely ro filter replacement especially important for households here. A filter schedule designed for average water conditions may not be enough in this area. Understanding What Each Filter Stage Does Before you can reverse osmosis water filter replacement correctly, it helps to understand what each one does and why it wears out. Sediment Pre-Filter (Stage 1) This filter removes physical particles: sand, silt, rust, and dirt. It protects every stage that follows. Because it takes the heaviest initial hit, it wears out fastest. Carbon Block Pre-Filter (Stage 2 and sometimes Stage 3) Activated carbon removes chlorine, chloramine, volatile organic compounds (VOCs), and bad taste and odor. This is critical in Tracy because chloramine in municipal water will actively damage your RO membrane if carbon filtration is not doing its job. RO Membrane (Core Stage) The membrane is the heart of the system. It pushes water through a semi-permeable barrier under pressure, blocking up to 99% of dissolved contaminants including lead, fluoride, arsenic, nitrates, and total dissolved solids (TDS). The membrane does not physically clog like a carbon filter, it degrades chemically and loses rejection efficiency over time. Post-Carbon Filter (Final Stage) After filtered water sits in the storage tank, a post-carbon or post-filter polishes it one final time before it reaches your faucet. This removes any residual taste or odor picked up during storage. If your system is a 6-Stage Water Filtration System, you may also have an additional remineralization or alkaline stage. That stage typically uses a mineral cartridge that needs replacement roughly once a year, depending on your water usage. The Realistic Replacement Schedule for RO Filters Here is a clear reference table for how often each filter stage should be replaced under typical residential conditions: Filter Stage What It Removes Replacement Interval Sediment Pre-Filter Dirt, rust, silt Every 6 to 12 months Carbon Block Pre-Filter Chlorine, chloramine, VOCs Every 6 to 12 months RO Membrane Lead, fluoride, TDS, arsenic Every 2 to 3 years Post-Carbon Filter Residual taste and odor Every 12 months Remineralization Cartridge Adds minerals back to water Every 12 months Important note for Tracy homeowners: If your home uses more water than average, if you have a large household, or if your incoming water has high TDS or heavy sediment, move toward the shorter end of these intervals. High sediment loads are common in parts of the Central Valley, and they will exhaust your pre-filters faster than the general schedule suggests. Warning Signs That Your Filters Need Changing Now Keep an eye on your system in case something seems off before its scheduled date arrives your system could warn of problems even before that. Watch for these signs: Slow water flows from the RO faucet. An optimal RO system should fill a glass within 30 seconds; otherwise, its filters or membrane may have become compromised and is no longer functioning as intended. If this takes any longer, your pre-filters may have become blocked up with debris, and membrane degradation could be to blame. Unpleasant taste or odor. If water starts tasting flat, musty, or slightly chemical again, your carbon pre-filter or post-filter is likely exhausted. Rising TDS readings. With an inexpensive TDS meter in hand, readings on your filtered water should be significantly lower than its source water any shrinkage indicates your RO membrane’s efficiency has diminished and needs repair. Cloudy or discolored water. This can indicate a failed sediment filter or a compromised membrane. The tank fills very slowly or not at all. A badly clogged pre-filter starves the membrane of inlet pressure, causing the tank to take hours to refill. How to Change RO Filters: Step-by-Step Most homeowners in Tracy can handle this as a DIY job. You do not need a plumber. You do need the right reverse osmosis water filter replacement cartridges for your specific system and about 30 minutes. What you will need: Replacement filter cartridges (matched to your system) Filter housing wrench (usually included with your system) A bucket or towels A clean cloth or paper towels Step 1: Turn off the water supply. Close the dedicated cold water supply valve that feeds your RO system. This is usually a saddle valve or ball valve on the cold supply line under the sink. Step 2: Close the storage tank valve. There is a small valve on the top of the storage tank. Turn it off to stop water from flowing back through the system while you work. Step 3: Open the RO

How to remove chlorine from tap water comparison showing cloudy vs clear filtered drinking water
Water Filter System

How to Remove Chlorine from Tap Water (Without Boiling or Buying Bottled)

If your tap water smells or tastes like a pool. Municipal water suppliers use chlorine to kill bacteria and stop waterborne diseases, but it can make your drinking water taste and smell bad. This is a prevalent concern for homeowners in Tracy, CA, especially families who want clean, chemical-free water at home.  At RO Water Filter System, we understand how frustrating it is to deal with chlorine in tap water. In this guide, we’ll explore practical, safe, and effective ways how to remove chlorine from tap water, giving you clear options for better-tasting, healthier water for you and your family. Unlike many generic guides online, we focus on real solutions that work in everyday home settings. Why Chlorine is in Your Tap Water Adding chlorine to public water supplies kills bacteria and lowers the risk of getting sick from drinking water. The amount of chlorine in tap water is measured in milligrams per liter (mg/L), and it is safe to consume. But high levels can make the taste and smell very overpowering, especially when you drink or cook with water.  Excess chlorine can also lead to the formation of disinfection byproducts, which, while regulated, may affect taste and odor. Homeowners often notice this more when water is used directly from the tap without filtration. Understanding why chlorine is present helps homeowners choose the right removal method, rather than just masking the taste or smell temporarily. 5 Practical Ways to Remove Chlorine from Tap Water 1. Activated Carbon Filtration How it works: Carbon filters do a great job of getting rid of chlorine. Activated charcoal absorbs chlorine molecules when water runs through it, making it taste and smell better. Practical application: Use a countertop carbon filter pitcher for small quantities. Install an under-sink carbon filter for more consistent results. Effectiveness: Works immediately, does not remove fluoride. For families looking for long-term solutions, the 7-Stage Water Filtration System from RO Water Filter System can combine carbon filtration with reverse osmosis for comprehensive purification. 2. Boiling Water How it works: Boiling water causes chlorine or chloramine to evaporate. Boil water for 15–20 minutes and allow it to cool before use. Effectiveness: Works well for small batches of water. Will not remove fluoride. Boiling is a good way to cook or make drinks, but it might not be the best way to get drinking water every day. 3. Using Vitamin C How it works: Vitamin C neutralizes chlorine through a chemical reaction, converting it into harmless compounds. Practical application: Add a small amount of vitamin C powder to water. Use vitamin C-based filter cartridges for larger volumes. Effectiveness: This procedure is safe, quick, and works especially well for getting rid of chlorine in fish tanks or drinking water for people who are sensitive to it. 4. Reverse Osmosis Filtration How it works: Reverse osmosis (RO) systems push water through a membrane that only lets some things through. This gets rid of chlorine, dissolved solids, and other pollutants. Key considerations: Will reverse osmosis remove chlorine? Yes, if paired with a pre-carbon filter. Standard RO membranes alone do not remove chlorine efficiently. pH impact: RO water is slightly acidic; the typical pH of reverse osmosis drinking water ranges from 5.5 to 7.0. RO systems are ideal for homeowners in Tracy, CA, who want consistent, chemical-free Drinking Water Filtration without daily manual intervention. 5. Aeration How it works: Simply exposing water to air allows chlorine to dissipate naturally. Practical application: Fill a container and let water sit uncovered for 24 hours. Stirring water speeds up the process. Effectiveness: Works best with municipal water that has free chlorine, but not with water that has chloramine, which is more stable. Choosing the Right Solution for Your Home When deciding how to dechlorinate tap water, consider these factors: Family size and daily usage: Small-scale solutions like pitchers work well for one person or a couple. Whole-house systems are best for families with many members. Water source: Find out if your city’s water uses chlorine or chloramine; some procedures work better with one than the other. Additional contaminants: If your water has fluoride, sediment, or other chemicals in it, you may need to use both carbon filtering and RO. Maintenance: Carbon filters need to be replaced every so often, while RO systems need to have their membranes and pre- and post-filters serviced once a year. For homeowners who want the most comprehensive solution with minimal daily effort, installing a professionally maintained read our How to Make Tap Water Taste Better ensures chlorine, sediment, and other contaminants are removed effectively. Signs Your Tap Water May Have Too Much Chlorine Look for these indicators in your home: Strong chemical taste or odor in water Cloudy appearance after boiling Dry skin or hair after frequent washing Sensitive family members experiencing mild irritation Testing water for chlorine levels using at-home kits can help confirm whether filtration or treatment is necessary. Common Mistakes Homeowners Make Assuming boiling removes all chemicals (does not remove fluoride) Using RO systems without pre-carbon filters for chlorine removal Neglecting filter replacement schedules Ignoring local water reports that indicate chlorine or chloramine levels Conclusion Chlorine may be present in how to remove chlorine from tap water? But that doesn’t have to dictate your consumption habits. Homeowners in Tracy, CA, can benefit from several options for getting clean, great tasting water that won’t contain chlorine, these range from basic methods such as boiling and aeration through reverse osmosis to carbon filtering, with each approach having both advantages and drawbacks that should help make smart decisions. At RO Water Filter System, we assist homeowners in creating effective chlorine removal systems to make for safe drinking water every day. Reach out to us and discover which system best meets the needs and lifestyle requirements of your home and lifestyle for safe, refreshing drinking water every time! FAQs How long does it take for chlorine to evaporate from tap water naturally? It typically takes 24 hours for free chlorine to dissipate if water is left in

A clear glass being filled with fresh water from a modern kitchen faucet, illustrating how to make tap water taste better.
Water Filter System

How to Make Tap Water Taste Better: 8 Effective Methods to Improve Water Quality

The good news is that knowing how to make tap water taste better does not require a chemistry degree or a big budget. Some fixes cost nothing. Others are a one-time investment that pays off for years. This guide walks you through eight real methods, explains why each one works, and helps you figure out which solution fits your home and your situation. If you turn on the faucet and are horrified by what comes out, you are being told something true. Something in your water supply is the reason why your tap water tastes flat and odd, smells like a swimming pool, or has a metallic flavor. Additionally, if you reside in Tracy, California, you are well aware that the water there isn’t the greatest in the state. It originates from a combination of local groundwater wells, transporting minerals, agricultural runoff residue, and disinfection chemicals that all have an impact on the daily flavor of your water. How to Make Tap Water Taste Better for Bad Taste in the First Place? Before jumping to solutions, it helps to understand what is actually causing the bad taste. Different problems call for different fixes. Chlorine or chemical taste: City water is treated with chlorine or chloramine to kill bacteria. This is necessary, but it leaves behind a noticeable chemical flavor, especially in warmer weather when treatment levels rise. Metallic taste: A water taste like metal usually points to iron, manganese, zinc, or copper in your water. This can come from your water source or from aging pipes in your home. In older California homes, corroded pipes are a frequent and overlooked cause. Rotten egg smell or taste: This comes from hydrogen sulfide gas, which forms naturally in groundwater. It is harmless in small amounts but completely unpleasant to drink. Earthy or musty flavor: Organic matter such as algae or sediment can give water a stale, swampy quality. This is more common with surface water sources like the Delta and Aqueduct systems that serve parts of the San Joaquin Valley. Flat or “empty” taste: Heavily treated water or water that has been sitting in pipes can taste lifeless. This is not a safety issue, but it makes drinking enough water much harder. Once you know what is behind the bad taste, you can choose a method that actually solves the right problem. 8 Effective Methods to Make Tap Water Taste Better 1. Chill Your Water Before Drinking Cold water always tastes better than warm water. Temperature makes it harder for you to taste small off-flavors, like chlorine. Put water in a glass pitcher and put it in the fridge. Within a few hours, the chill alone can make a noticeable difference. This is the simplest and cheapest method you can try today. This works best when the chlorine taste isn’t too strong. It won’t solve a strong Sulphur or metal issue on its own. 2. Let Water Sit and Aerate Before Drinking Chlorine is a volatile compound, meaning it escapes into the air when water is left uncovered. Pour your tap water into an open pitcher and let it sit on the counter for 30 to 60 minutes. The chlorine will off-gas naturally, reducing that chemical taste without any equipment. For faster results, pour the water back and forth between two containers a few times. This adds oxygen and speeds up the process. It is a practical method for renters or anyone not ready to invest in a filtration system yet. 3. Use a Pitcher Filter with Activated Carbon An activated carbon pitcher filter is one of the most affordable and widely available options for improving tap water taste. Carbon filters work by adsorbing chlorine, chloramines, and some volatile organic compounds as water passes through. The result is noticeably cleaner-tasting water in minutes. These are ideal for mild taste issues and small households. They are affordable upfront but require regular filter cartridge replacements, typically every 2 months. They will not remove heavy metals, dissolved solids, or harder contaminants. If your water tastes strongly metallic or comes from an older home with aging pipes, a pitcher filter alone may not be enough. 4. Add Natural Flavor Enhancers Natural fruit and herb infusions are a clean way to hide a bad taste while you work on a longer-term remedy. Adding sliced cucumber, lemon, lime, or fresh mint to a pitcher of cooled water may make it a lot more drinkable. These don’t filter anything out, but they help you keep hydrated until you figure out a permanent solution. Don’t buy drink packs or powders that already have flavor in them. A lot of them include fake sugars, preservatives, and salt that make it pointless to drink pure water. 5. Flush Your Pipes Before Drinking If your water develops a metallic taste early in the morning or after long periods of non-use, your pipes may be the source. Water sitting in pipes absorbs trace amounts of metals from the pipe material itself. Run your cold tap for 30 to 60 seconds before drinking or cooking. This clears the standing water from your home’s internal pipes and pulls in fresher water from the main supply line. In homes with older galvanized or copper plumbing, this simple habit can reduce metallic taste meaningfully. It costs nothing and takes less than a minute. 6. Boil Your Water for Temporary Chlorine Removal Boiling drives chlorine out of water fairly quickly. Bring water to a full boil, then let it cool uncovered. The open boil allows chlorine to escape as steam. This method is effective for chlorine but has limitations: it does not remove dissolved minerals, heavy metals, or other contaminants. It also concentrates whatever minerals are left behind once the water cools. Use boiling as a temporary solution or in combination with refrigeration, not as a standalone long-term fix. 7. Install a Faucet-Mount or Under-Sink Carbon Filter A step above the pitcher filter, faucet-mount and under-sink carbon filters provide on-demand filtered water with much higher capacity. Under-sink systems

DIY install reverse osmosis water filter setup with membrane housing and pre-filters
Installation

How to Install Reverse Osmosis Water Filter in 8 Steps (2026 Guide)

Your kitchen tap looked fine last Tuesday. But white crust on the faucet aerator, a faint chemical smell, and filtered-water bottles multiplying in the fridge tell a different story. An under-sink reverse osmosis system solves all three problems permanently and most homeowners can install reverse osmosis water filter​ themselves in a single afternoon, no license required. This guide covers every step of the RO system setup, including the two things most tutorials skip: how to verify storage tank pressure before you connect anything, and why the angle of your drain line matters more than the brand of your system. RO Water Filter System has guided hundreds of homeowners through this exact process, and the mistakes below are real ones we’ve seen repeatedly. What You Need Before You Start Before touching any fitting, take five minutes to assess your setup. Open up the cabinet under your kitchen sink and examine three aspects: Available space: Most standard under-sink RO systems need roughly 15 to 18 inches of width and about 14 inches of height. Measure before you buy. Cold water shut-off valve: This is the valve on the cold water supply line under your sink. It needs to be functional. If it has not been turned in years, test it before installation day. Drain pipe access: You will attach a drain saddle to this pipe to carry wastewater out. Make sure you can reach it comfortably. Your water pressure at home needs to be checked regularly as an RO system operates best between 40-80 psi, otherwise it will produce water slowly and the storage tank may take much longer to fill up with it. A simple gauge from any hardware store should help identify where you stand. RO Water Filter System has helped hundreds of homeowners get this right, and this guide reflects that hands-on experience. Tools You Will Need Adjustable wrench Phillips and flathead screwdrivers Electric drill with drill bits (including one rated for your sink or countertop material) Teflon tape (for metal threaded joints only) Tubing cutter or sharp utility knife Small bucket or towel Low-pressure tire gauge (to check tank pressure) Step-by-Step: How to Install Reverse Osmosis Water Filter Step 1: Shut Off Cold Water Supply Once your cold water shut-off valve is off, open your kitchen faucet briefly so as to release pressure in your line and prevent an expensive mess during disconnections of supply lines. Step 2: Install the RO Faucet (Rooter-Only Faucet). Step one is often the longest and most time-consuming step, for instance, if a new hole needs drilling. Most kitchen sinks already include an unoccupied soap dispenser hole or knockout, but if yours does not, a 7/16-inch hole must be drilled to accommodate it. When drilling stainless steel surfaces, use either a hole-saw, step drill bit, or step bit slowly, while for granite/composite surfaces, use a carbide-tipped bit and keep the area wet as you work, or both to minimize scratching as much as possible during this step! RO faucet installation steps: Feed the faucet base through the hole from the top Place the rubber gasket, then the flat washer, then the mounting nut from underneath Tighten the nut until the faucet does not rotate, but do not overtighten on porcelain or granite Attach the faucet adapter to the faucet stem threads and hand-tighten, then add a half-turn with a wrench Do not use Teflon tape on the faucet adapter fitting unless the manufacturer specifically says to. On plastic compression fittings and push-to-connect ports, tape can prevent a proper seal. Step 3: Mount the RO Filter System Position the RO unit on one of the side walls within its cabinet, typically the right side unless another wall offers clear access for filter maintenance purposes. Leave at least 3-4 inches below filter housings so canisters can be dropped for cartridge changes without dismantling the whole unit. Use the included bracket and screws to mount it securely to the wall, being sure that it’s level; tilted manifolds create uneven flow patterns, which strain fittings over time. Place your storage tank towards the back of the cabinet; it doesn’t necessarily need to be upright, as space may limit this option. Step 4: Connect to the Cold Water Supply Line Pay special attention when following DIY guides; most may leave important steps out. There are two primary options for connecting the cold water line: Option A: Angle Stop Adapter (recommended) An angle stop adapter threads directly onto your existing cold water shut-off valve for easy and secure installation of an RO system. Disconnect existing supply line from shut off valve, thread angle stop adapter onto valve then reconnect supply line at top port before connecting RO feed water tubing at bottom port. Option B: Saddle valve A saddle valve clamps onto the cold water pipe and self-pierces it. It works but is considered less reliable long-term. In California, some local codes restrict saddle valves on copper lines. If you are unsure, the angle stop adapter is the better choice. Once connected, cut the feed water tubing to length, leaving a few inches of slack. Push the tubing firmly into the inlet port on your RO system until you feel it seat fully, then give it a gentle tug to confirm it will not pull out. Step 5: Install the Drain Saddle A drain saddle connects directly to your sink drainpipe and removes RO system wastewater from underneath your sink, typically plumber to install reverse osmosis system above and beneath where an RO system connects, such as with dishwasher or garbage disposal connections. Mark your pipe, drill a 7/32-inch hole on one side only of it and tighten with an even pressure. Next, connect the wastewater tube from your RO system’s drain port directly to the saddle clamp, without abrupt turns that could potentially create backflow issues. Step 6: Connect the Storage Tank Your storage tank ships from the factory at 5 to 7 psi of air pressure; use a low-pressure tire gauge on its Schrader valve at

Is reverse osmosis the same as distilled water clean drinking water in glass comparison
Reverse Osmosis

Is Reverse Osmosis the Same as Distilled Water? 7 Key Differences You Should Know

You spent $40 on a gallon of distilled water for your CPAP machine, then looked at your under-sink RO system and wondered, is reverse osmosis the same as distilled water? It’s a fair question. Both look crystal clear, both remove contaminants, and both cost more than tap water. The differences in how each process works and what each one misses, directly affect which one belongs in your home. At RO Water Filter System, we walk customers through this comparison every week, especially in areas like Tracy, CA, where local water quality makes the choice even more consequential. This guide gives you the full picture, including a contamination blind spot that almost no comparison article mentions. Is Reverse Osmosis the Same as Distilled Water? Reverse osmosis does not produce identically purified water to that produced through distillation. Both processes utilize separate processes and produce distinct tastes, costs and efficiency outcomes that differ drastically in taste, efficiency and use ability. Reverse Osmosis uses a semi permeable membrane to filter contaminants. Distillation uses heat and evaporation to separate out impurities from water. Both can serve different functions when applied in real world situations. Although they appear similar on paper, in everyday household usage each serves its own specific function. How Reverse Osmosis and Distilled Water Work Reverse Osmosis Process Reverse osmosis systems push water through multiple filtration stages, including: Sediment filter Carbon filter RO membrane Post-filter polishing This system removes: Heavy metals Chlorine Bacteria and viruses Dissolved solids Water passes through the membrane under pressure, leaving contaminants behind. For homeowners, this is the most common point-of-use drinking water solution. If you want to explore system options, see Reverse Osmosis Water Filter. Distilled Water Process Distillation works by: Boiling water into steam Leaving contaminants behind Condensing steam back into liquid form This removes: Minerals Bacteria Most contaminants including heavy metals It produces very pure water, but the process is slow and energy-intensive. Seven Key Differences Between Reverse Osmosis and Distilled Water 1. Filtration Method Reverse osmosis uses pressure and a membrane Distillation uses heat and evaporation This affects energy use and convenience at home. 2. Speed and Daily Use RO systems produce water continuously Distillation is slow and batch-based For daily drinking, RO is far more practical. 3. Taste and Mineral Content RO water: Removes most contaminants Retains slight mineral balance depending on system Distilled water: Removes almost everything Often tastes flat or empty This is why many people ask, is distilled water better than reverse osmosis water. For drinking, most prefer RO taste. 4. Energy Consumption RO systems use minimal electricity Distillers require constant heating Over time, distillation costs more to run. 5. Installation and Convenience RO systems: Installed under sink Provide on-demand water Distillers: Countertop units Require manual operation If convenience matters, RO wins clearly. For homeowners in Tracy, CA, professional setup also ensures better performance. Learn more about RO System Installation. 6. Contaminant Removal Range Both methods remove: Heavy metals Bacteria and viruses Dissolved contaminants But RO systems also include carbon filtration, which helps with: Taste Odor Chlorine removal This makes RO better for everyday drinking water quality. 7. Cost Over Time RO systems: higher upfront cost, low maintenance Distillers: lower upfront, higher energy costs Budget-conscious buyers often find RO more cost-effective long term. Reverse Osmosis vs Distilled Water Comparison Table The difference between distilled water and reverse osmosis comparison given below: Feature Reverse Osmosis Distilled Water Process Membrane filtration Boiling and condensation Speed Continuous Slow batch process Taste Clean, slightly natural Flat, neutral Energy Use Low High Installation Under sink system Countertop unit Daily Use Very convenient Limited Cost Over Time Lower Higher Is RO Water the Same as Distilled Water for Drinking? No, is RO water the same as distilled is a common question, but they are not identical in real use. For drinking: RO water is more practical and better tasting Distilled water is often used for medical or lab purposes Most homeowners choose RO because it balances purity and usability. Is Boiled Water the Same as Distilled Water? Another frequent misperception is boiled water the same as distilled water are equivalent. Answer is no. Boiling water: Kills bacteria Does not remove heavy metals or dissolved solids Distillation: Removes contaminants by separating steam So boiling is not a replacement for either RO or distilled water. When Reverse Osmosis Is the Better Choice Reverse osmosis can provide exactly the clean water source you require if that’s what’s desired: Safe, clean daily drinking water Better taste compared to bottled water Low-maintenance filtration Continuous supply It is especially useful in areas where tap water may contaminants including chlorine, lead, or high TDS levels. When Distilled Water Makes More Sense Distilled water is better for: Medical devices like CPAP machines Laboratory use Appliances like steam irons It is not designed for daily household drinking due to cost and inconvenience. Common Mistakes Homeowners Make Choosing Based on “Purity” Alone Many assume more purification is always better. But over-purified water can lack taste and practicality. Ignoring Installation Quality Even the best system fails if installed poorly. A professional setup ensures: Proper pressure Leak-free connections Maximum filtration performance Not Considering Long-Term Costs Distillers may seem cheaper upfront, but electricity costs add up fast. Overlooking Water Usage Needs A family needs consistent water supply, not small batches. This is where RO systems fit better. How to Choose the Right System for Your Home Ask yourself: Consider whether water is necessary for daily drinking purposes?  Do you want convenience or occasional use? Are you concerned about energy costs? Is taste important to you? If your answer leans toward daily use and convenience, reverse osmosis is the better option. If you are still exploring options, this guide on building a How to Make a Water Purification System can help. Conclusion Is reverse osmosis the same as distilled water and most homeowners fail to recognize its differences. Reverse Osmosis provides you with an economical and practical method of purified drinking water daily without incurring excessive costs for purification systems.

Does reverse osmosis remove PFAS scientists collecting contaminated water samples for testing
Reverse Osmosis

Does Reverse Osmosis Remove PFAS? 6 Ways It Improves Water Safety

Have you heard reports about PFAS contamination of local water supplies, leaving you to wonder does reverse osmosis remove PFAS? Yes, reverse osmosis removes PFAS. A quality RO system with activated carbon pre-filters reduces PFAS concentrations by 90% or more, making it one of the most effective home water treatment options available. Reverse osmosis from start to finish, how it works, its effectiveness in reducing PFAS levels, what to expect from a system, and its place within your overall water treatment plan. RO Water Filter System cover what other sources neglect or oversimplify for practical clarity and guidance. Does Reverse Osmosis System Remove PFAS Per- and polyfluoroalkyl substances (PFASs), also referred to as forever chemicals, are an extensive group of synthetic chemicals commonly used for firefighting foam applications, nonstick cookware production, waterproof fabric products and industrial processes. Due to their lengthy chemical chains they do not break down easily in the environment, hence why PFAS are known as forever chemicals. In water supplies, PFAS can come from industrial sites, firefighting training areas, and even landfill leachate. They have been linked to health effects when present at certain levels.  How Reverse Osmosis Works A typical home Reverse Osmosis Water Filter system uses a combination of filters and a membrane to clean tap water at the point of use, usually under the kitchen sink. The process involves: Pre‑filtration that removes sediment and chlorine. Activated carbon filters that reduce many organic chemicals. A reverse osmosis membrane that separates water molecules from many dissolved solids and contaminants. Post‑filtration for taste and final polishing. Does Reverse Osmosis Remove PFAS? Yes The short answer to does reverse osmosis remove PFAS is that a properly designed and maintained reverse osmosis system can reduce PFAS levels in drinking water significantly. Reverse osmosis systems are among the most effective home water treatment technologies for PFAS reduction. That effectiveness depends on quality filtration stages and the membrane performance. Here’s why RO works for PFAS: Small pore size of the membrane rejects many PFAS molecules. Activated carbon pre‑filters help capture some PFAS before reaching the membrane. PFAS compounds are large compared to water molecules, making them less likely to pass through. Multiple filtration stages enhance overall reduction. Proper installation ensures optimal pressure and contact time. Routine maintenance ensures the system continues to perform as intended. While no home system can guarantee 100 percent removal, reverse osmosis consistently performs well in independent testing for a wide range of PFAS compounds. How Effective Is Reverse Osmosis Against PFAS Studies and practical water testing show that reverse osmosis can reduce PFAS concentrations by 90 percent or more when the system is correctly matched to water quality and maintained. The activated carbon filters in front of the membrane play a key role by adsorbing some PFAS before they even reach the membrane. The combination of carbon and RO makes a strong barrier. Note: Different PFAS molecules vary in size and chemical behavior. Long‑chain PFAS are generally easier for RO systems to reduce than some short‑chain variants. Good design and high‑quality components make a meaningful difference. Signs You May Have PFAS in Your Water You cannot see, smell, or taste PFAS in water. The only way to know if they are present is through testing by a qualified lab. Some signs that further testing may be warranted in Tracy CA include: Known industrial sites or firefighting training nearby. Water utility reports showing PFAS detections. Health advisories from local public health agencies. If you suspect PFAS, start with a certified water test that includes PFAS panels. Reverse Osmosis vs Other Filtration Options Reverse Osmosis vs Carbon Filters Alone Carbon filters do remove some PFAS, but a reverse osmosis system adds an additional barrier through its membrane. For many homeowners with PFAS concerns, RO offers higher confidence in reduction levels. For general water quality (taste, chlorine, odor) alone, carbon filters may be adequate. But for PFAS, the membrane is a key advantage. Reverse Osmosis vs Saltless Water Softener A saltless water softener improves water feel and reduces scale without using salt. It does not target PFAS. Softening and PFAS reduction serve different purposes: Softening helps appliances and plumbing. RO helps reduce chemical contaminants including PFAS. When Whole House Systems Make Sense A whole house filtration system treats all water entering your home. It’s ideal if you want every tap water outlet filtered. But for PFAS, whole house systems must include filters rated for PFAS removal. In many cases, homeowners choose a point of use RO system for drinking and cooking water because it is more cost‑effective than treating the entire house with RO level filtration. If you are comparing options, read our guide on House Water Filter vs Reverse Osmosis to determine what fits your situation. What to Expect with Installation Correct installation of a reverse osmosis system matters for performance. Here’s what to know: RO systems require a dedicated faucet. Proper water pressure ensures membrane efficiency. Pre‑filtration should match your local water quality conditions. Avoid DIY shortcuts that compromise seals or flow. Professional fitting helps ensure you get predictable results and reduces risk of leaks or reduced performance. Maintenance Matters: How Often to Change Reverse Osmosis Filter To keep your RO system reducing PFAS effectively, you must follow a maintenance schedule: Sediment and carbon pre‑filters: change every 6 to 12 months. Reverse osmosis membrane: typically replace every 2 to 3 years. Post‑filters: change annually or per manufacturer advice. Maintenance needs depend on both water quality and use. Water has more sediment or chemicals, more frequent changes might be required if water quality declines; regular checks ensure consistent performance from your system. Common Homeowner Questions and Mistakes Mistake: Thinking Any Filter Will Do Many homeowners assume their pitcher or faucet filter handles PFAS it usually doesn’t. Most basic filters lack the right media or pore size to capture these chemicals. If PFAS is your concern, you need a system specifically certified for it. Mistake: Skipping a Water Test Every water supply is different. Choosing a filtration system

A side-by-side comparison explaining what is activated carbon filtration by showing a used, dark-grey carbon block filter next to a clean, white replacement filter.
Blog

What Is Activated Carbon: 8 Reasons It Is Important for Clean Water

Understanding what is activated carbon and its function within water filters enables you to make better choices when installing and maintaining them. At RO Water Filter System, we help homeowners select an efficient filtration and carbon filter water setup based on what their actual water contains rather than choosing something purely from product boxes. If the tap water in your home has an unfamiliar taste or chlorine scent, leaving you uncertain of its source, don’t feel ashamed, homeowners in Tracy CA, often rely on municipal water sources that contain disinfection byproducts, chlorine and trace chemicals, one material has emerged as being particularly important in purifying this water. What Is Activated Carbon, Really? Activated carbon is a processed form of carbon that has been altered to develop numerous tiny internal pores, giving it a massive surface area; one gram can cover an area greater than 1,000 square meters, that’s roughly equivalent to packing half of a basketball court into something you could hold in your hand! Filters are constructed out of carbon-rich raw materials like coconut shell, coal, or wood; coconut shell is by far the most popular option used in drinking water applications as its hard and porous structure allows it to provide optimal taste and odor removal performance. Consumer products typically refer to this material as activated charcoal; while in water treatment and industrial settings it should more accurately be called activated carbon; both terms refer to its core essence. How the Activation Process Works Raw carbon material is first heated in a low-oxygen environment to burn off impurities and leave a carbon skeleton behind. Then it is exposed to steam or activating chemicals at very high temperatures. This second step is what opens up and expands the pore structure throughout the material. The result is a carbon that has a surface area hundreds of times larger than it would have without this process. That expanded surface is what makes it so effective at trapping contaminants. The process also controls the size and distribution of pores, which is why different grades of activated carbon perform differently depending on what they are being used to filter. How Activated Carbon Removes Contaminants From Water Activated carbon filters work through a process called adsorption. This is different from absorption. In absorption, a substance is taken into another material, like a sponge soaking up water. In adsorption, contaminants stick to the surface of the carbon through a chemical attraction. As water passes through a carbon filter, organic compounds, chlorine, chloramines, volatile organic compounds (VOCs), pesticides, and certain industrial chemicals are drawn to the carbon surface and held there. They are physically pulled out of the water as it flows through. This is not the same as filtering particles out by size. It is a chemical bonding process, which is why activated carbon is particularly effective against contaminants that other filters miss. 8 Reasons Activated Carbon Is Important for Clean Water 1. It Removes Chlorine and Chloramine Effectively Municipal water systems in California use chlorine and chloramines to disinfect water. These chemicals do their job in the distribution system, but they are not something you want in your drinking water. A carbon block water filter or GAC stage removes both effectively and improves taste and smell almost immediately. 2. It Reduces Volatile Organic Compounds (VOCs) VOCs enter water supplies from industrial runoff, fuel storage, and agricultural activity. They are a real concern for homes near farmland or older infrastructure. A granular activated carbon filter traps these compounds before they reach your glass. 3. It Protects Other Filter Stages in RO Systems In a reverse osmosis system, activated carbon pre-filters protect the delicate RO membrane from chlorine damage. Chlorine degrades polyamide membranes quickly. Without a carbon stage before the membrane, the membrane has a much shorter lifespan. 4. It Improves Taste and Odor Without Chemicals Activated carbon is an efficient solution for families wanting cleaner-tasting water without adding anything extra, no additives, salts or chemicals required! By physically adsorbing into water sources directly, activated carbon improves taste and smell without alteration, an attractive proposition when seeking non-additively flavored solutions without the hassle. 5. It Works in Multiple Filter Formats Activated carbon is used in several filter types: Granular activated carbon (GAC) filter: Loose granules packed into a housing. Good flow rate, lower pressure drop, often used in whole house and under-sink pre-filter stages. Carbon block water filter: Compressed carbon ground into a fine powder and shaped into a solid block. Denser contact time and finer contaminant removal than granular. CTO filter: Stands for Chlorine, Taste, and Odor. A specific type of carbon block filter designed to address those three problems efficiently in RO pre-filter stages. Powdered activated carbon (PAC): Used in some municipal treatment processes. Not typically found in home systems but worth knowing exists. 6. It Is a Key Stage in Multi-Stage Filtration Systems An activated carbon pre-filter and post-filter, commonly seen in 7-Stage Water Filtration System, often serves two distinct roles in such a setup, acting both as pre-filtration prior to RO membrane use and post-filter. This dual approach ensures comprehensive chemical contamination coverage. 7. It Works Alongside Other Technologies for Whole-Home Protection For homeowners who want clean water from every tap, not just the kitchen, a Water Purification System that combines a whole house carbon pre-filter with a point-of-use RO system is a strong option. The carbon stage handles chlorine and organics across the home, while the RO system handles dissolved solids and heavier contaminants at the point where you drink. 8. It Is Sustainable When Sourced Correctly Coconut shell-based activated carbon is an eco-conscious homeowner’s go-to material when selecting water filter products in Tracy or elsewhere in California. When considering filter products to purchase, eco-consciousness matters greatly in their choice process. Types of Activated Carbon Used in Home Water Filters Type Form Common Use Best For Granular Activated Carbon (GAC) Loose granules Whole house pre-filters, first RO stage Chlorine, taste, odor, some VOCs Carbon Block Compressed powder Under-sink, RO pre

can hard water cause hair loss person washing hair with hard water buildup effects
Water Filter System

Can Hard Water Cause Hair Loss? 5 Signs It May Be Affecting You

If your hair seems dry, brittle or thinner than usual, hard water might not be to blame. Can hard water cause hair loss? Yes, in many instances yes; as can any product used directly. Many homeowners deal with hard water which has an adverse impact on both scalp and hair over time, often contributing to breakage, shed hairs or build-up on scalp surfaces over time. At RO Water Filter System, we often hear this question from families dealing with hard water every day. This guide explains what hard water does to your hair, 5 signs it may be affecting you, and what you can do at home to protect your scalp and strands. What Is Hard Water and Why It Matters for Hair Hard water contains elevated concentrations of calcium and magnesium minerals that are nontoxic for consumption but may pose problems to both your scalp and hair. When washing, these minerals don’t rinse away easily leaving behind an oily film on both your strands and scalp that won’t go away easily with shampooing alone. Over time, this leads to: Build up on the scalp Reduced moisture absorption Hair that feels rough and heavy Weak hair that is prone to breakage This is where people begin to ask about hard water and hair loss, especially when changes happen slowly. Can Hard Water Cause Hair Loss or Just Damage? Let’s address the main concern clearly. Hard water does not directly destroy hair follicles in most cases. It does not cause permanent hair loss on its own. However, it can lead to hair loss indirectly by damaging hair health over time. Here’s how: Mineral buildup blocks moisture from reaching hair Hair becomes dry and brittle Breakage increases during brushing and washing Scalp irritation can affect hair growth cycle So when people ask, can hard water cause hair loss, the practical answer is: It can contribute to hair thinning and shedding due to damage and breakage, especially over the long term. What Does Hard Water Do to Your Hair? Understanding this helps explain the bigger issue. 1. It Creates a Film on Hair Strands Minerals stick to your hair, forming a coating that makes it harder for water and products to penetrate. 2. It Dries Out Your Hair Even after washing, your hair may feel dry because moisture cannot absorb properly. 3. It Weakens Hair Structure Hair becomes less flexible and more likely to snap during daily care. 4. It Irritates the Scalp Some people experience itchiness or flakes due to buildup. This explains what does hard water do to your hair in real, practical terms. Five Signs of Hard Water on Hair You Should Not Ignore If you live in Tracy or nearby areas, these signs are common in homes with untreated water. 1. Hair Feels Dry Even After Conditioning Your conditioner no longer seems to be doing its job and your hair feels dry and unruly. 2. Increased Hair Breakage Have you noticed more hair strands appearing on your pillow, comb or shower drain? 3. Dull and Lifeless Appearance Hair begins to lose shine, leading it to appear dull or faded. 4. Scalp Feels Itchy or Coated Buildup on the scalp can clog pores and lead to itchy irritation. 5. Products Stop Working Properly Shampoos and treatments do not lather or rinse efficiently. These signs of hard water on hair may go overlooked by many homeowners. Why Hard Water Issues Are Common in Tracy, CA Water hardness varies by region, and Tracy has a known mix of mineral-rich groundwater sources. This means: Higher mineral content in tap water More buildup in plumbing and shower systems Increased exposure during daily washing If you notice scale on faucets or showerheads, it is often the same issue affecting your hair. How Hard Water Impacts Hair Growth and Long-Term Hair Health Hair growth depends on a healthy scalp and strong hair structure. Hard water interferes with both. Scalp Health Impact Mineral buildup can clog follicles Reduced oxygen and nutrient flow Irritation affects hair growth cycles Hair Strength Impact Weakened strands break before reaching full length Ends split faster Hair becomes thin over time This explains the relationship between water hardness and hair damage. Simple Ways to Test If Hard Water Is Affecting Your Hair You do not need lab testing to get a good idea. Try these simple checks: Soap does not lather easily White residue appears on fixtures Hair feels sticky after washing Towels feel stiff after drying If you notice these along with hair issues, water quality is likely a factor. Solutions That Actually Work for Hard Water Hair Problems Fixing this problem means taking on water itself rather than simply changing shampoo brands. 1. Use a Shower Filter (Short-Term Help) A shower filter can reduce some minerals and improve water feel. Good for: Mild hard water Temporary improvement Limitations: Does not fully remove calcium and magnesium 2. Install a Whole House Water Softener This is the most effective long-term solution. A Whole House Water Softener for Hard Water replaces calcium and magnesium with softer minerals. Benefits: Prevents buildup on hair and scalp Enhancing hair texture and shine are the two major goals in improving its health and condition. Protects plumbing and appliances 3. Upgrade to a Complete Water Filtration Systems If your concern goes beyond hardness and includes chlorine, sediment, or other water quality issues, a Water Filtration System addresses a broader range of contaminants.  If you want better overall water quality, a filtration system adds another layer of protection. These systems help reduce impurities that affect both hair care and overall health. For drinking water purity alongside hair and skin benefits, some homeowners pair a whole house softener with a 6-Stage Water Filtration System at the kitchen sink for clean, filtered drinking water throughout the home. Water Softener for Hair Fall: Is It Worth It? For homeowners dealing with ongoing hair issues, a water softener is often the most practical investment. It is especially useful if: You see multiple signs

How to make a water purification system for clean drinking water in glass
Blog

How to Make a Water Purification System at Home (Step-by-Step DIY Guide)

Water may often be taken for granted. But homeowners might question its quality when their tap water has an unusual taste or aroma, draws from outdated plumbing systems, or is extracted through alternative means. Rural communities, emergencies, or science projects often seek easy filtration ways to purify water using everyday materials. This guide details how to make a water purification system at home using an easy step-by-step approach, using common household materials to create a basic filtering system that can remove particles and improve clarity in drinking water. At RO Water Filter System, we assist homeowners in understanding both DIY solutions as well as professional ones so they can make informed choices regarding their drinking water sources. Why People Build a DIY Water Purification System Many individuals build a DIY water purification system as part of learning, emergency preparedness or temporary treatment needs. Homemade filters can improve water quality by filtering out dirt, sediment and impurities found in drinking water. Some common reasons include: Learning how filtration works Creating a science project or classroom experiment Preparing for outdoor or emergency situations Improving cloudy or dirty water in remote areas Understanding how filtration systems work before buying one A homemade water filtration system is helpful for basic filtration, though it should not replace a certified drinking water system when long term safety is required. Understanding How Water Filtration Works Before building a filter, it helps to understand how Water Filtration System remove contaminants. Filtration typically happens in layers. Each layer targets different types of particles in the water. A simple filter often includes: Gravel or stones These catch large debris such as leaves, dirt, or sediment. Sand Sand removes smaller particles that pass through the gravel layer. Activated charcoal Charcoal absorbs chemicals, odors, and some organic contaminants. Cloth or cotton This final layer helps trap very fine particles before the water exits the system. When water slowly moves through these layers, the result is cleaner and clearer filtered water. Materials Needed for a Homemade Water Filtration System Implement a quick and straightforward filter setup using common household items available nearby. Materials needed for construction: A plastic bottle or container. Gravel or small stones Clean sand Activated charcoal Coffee filter, cloth, or cotton A knife or scissors A second container to collect the filtered water Make sure all materials are rinsed before building the filter. Clean materials improve the quality of the filtration process. Step-by-Step Guide to Build a DIY Drinking Water Filter This simple process explains how to build a water filter at home using layered filtration. Step 1: Prepare the Container Cut the bottom off a large plastic bottle and turn it upside-down so the neck faces towards you; this allows water to flow naturally through its filter layers and into its container. Place the bottle inside another container that will collect the filtered water. Step 2: Add the Bottom Filter Layer Place a cloth or coffee filter inside the bottle neck. This layer prevents sand and charcoal from falling out while allowing water to pass through slowly. Step 3: Add the Charcoal Layer Pour a layer of activated charcoal on top of the cloth. Charcoal helps remove: Some chemicals Odors Certain organic impurities It is one of the most important layers in a homemade water filtration system. Step 4: Add Sand for Fine Filtration Next, add a thick layer of clean sand. Sand can capture small sediment particles to help purify water, providing greater clarity for users. As fine grain sizes diminish, their ability to filter out minute debris particles increases significantly. Step 5: Add Gravel or Stones Place a layer of gravel or small stones above the sand. This layer prevents the sand from shifting and filters larger particles such as leaves, dirt clumps, or debris. Step 6: Pour Water Slowly Through the Filter Slowly pour cloudy or dirty water through the filter’s top opening until all layers (gravel, sand, charcoal and cloth) have been passed through and collected into its container below. Your end goal should be clean water than before. Repeating the filtering process two or three times may produce better results. Important Safety Tip About Homemade Filters A DIY drinking water filter can remove dirt and improve water clarity, but it may not eliminate bacteria, viruses, or harmful chemicals. To make water safer for drinking, you should also consider: Boiling the filtered water for at least one minute Using water purification tablets Using a certified filtration system These additional steps help protect your health when using untreated water sources. Signs Your Tap Water May Need Better Filtration Many homeowners seek information on how to purify tap water at home because of changes in quality of the tap water they receive. Common warning indicators include: Cloudy water Metallic taste Chlorine smell Sediment in glasses or kettles Hard water scale on appliances If these signs appear regularly, a DIY filter may improve clarity but a proper household system will provide more reliable treatment. Homeowners in Tracy, California, often deal with minerals, chlorine treatment, and aging plumbing infrastructure that affect water taste and quality. When a DIY Filter Is Not Enough A homemade filter is useful for learning or short term use. Many households eventually need a more reliable filtration system. Situations where a professional system works better include: Contaminated groundwater Heavy chlorine taste Hard water scale buildup Concerns about lead or other metals Long term drinking water safety For example, a reverse osmosis system removes a much wider range of contaminants compared to basic filtration. Homeowners looking for stronger protection often choose a professional Drinking Water Filtration in Tracy CA, designed for kitchen or whole house use. DIY Filter vs Household Water Filtration System Understanding the difference helps homeowners choose the right solution. Feature DIY Water Filter Household Water Filtration System Purpose Temporary or educational use Long-term water treatment Filtration ability Removes sediment and some odors Removes many contaminants Cost Very low Higher upfront investment Reliability Limited Consistent filtration Maintenance Replace materials frequently Scheduled filter replacement A DIY filter demonstrates

Scroll to Top