Most homeowners complete a full install reverse osmosis water filter in under an hour. You do not need a plumber. You do not need special training. What you do need is the right sequence, the right tools, and a guide that does not skip the steps that actually cause problems.
This RO water filter installation guide covers all seven steps from shutting off your water supply to your first safe glass, plus an installation diagram, faucet placement guide, common mistakes, and a full FAQ section.
What You Need Before You Start
Before touching any fitting, open the cabinet under your kitchen sink and check three things:
- Available space: Most under-sink RO systems need 15–18 inches of width and about 14 inches of height. Measure before you buy a system.
- Cold water shut-off valve: Locate the valve on the cold water supply line. Test it, turn it off and back on. If it has not moved in years, test it before installation day, not during.
- Drain pipe access: You will attach a drain saddle to this pipe for wastewater. Confirm you can reach it comfortably.
Also check your water pressure. An RO system works best between 40–80 psi. Below 40 psi, production slows significantly and the storage tank may take many hours to fill. A basic pressure gauge from any hardware store confirms where you stand.
RO Water Filter System has helped hundreds of homeowners get this right, and this guide reflects that hands-on experience.
Tools & Parts Checklist
- Adjustable wrench
- Phillips and flathead screwdrivers
- Electric drill with drill bits (hole saw or step bit for faucet hole)
- Teflon tape (for metal threaded joints only not plastic push-fit)
- Tubing cutter or sharp utility knife
- Small bucket or towel
- Low-pressure tire gauge (to check storage tank air pressure)
- 7/32-inch drill bit (for drain saddle hole)
- 7/16-inch hole saw or step bit (for RO faucet hole, if needed)
Everything listed above is standard homeowner toolkit or available at any hardware store for under $15 total.
Step-by-Step: How to Install Reverse Osmosis Water Filter
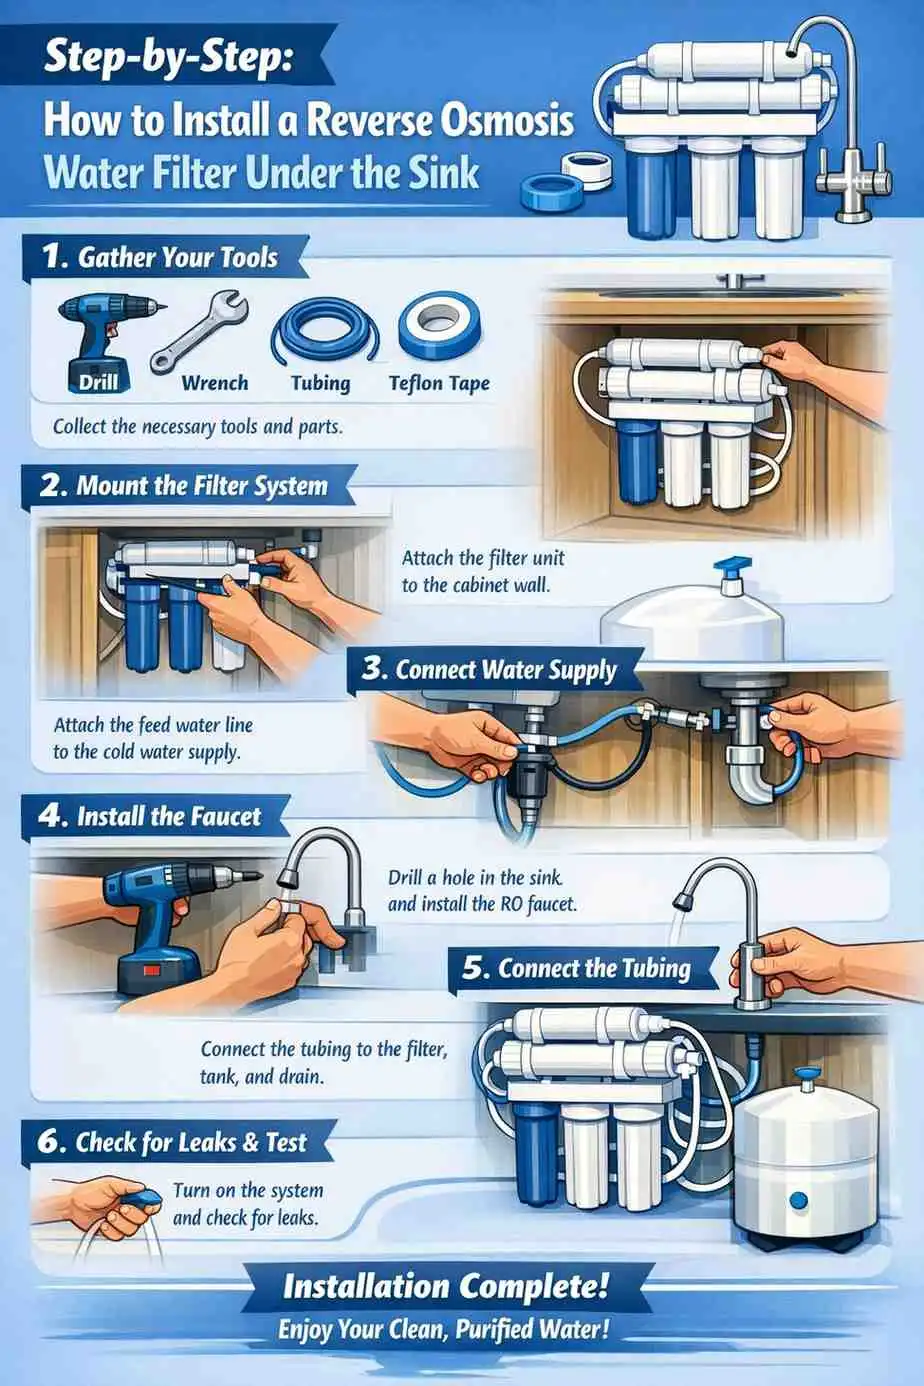
Follow these 7 steps in order. Each one sets up the next skipping ahead is the most common cause of leaks and slow flow after installation.
Step 1: Shut Off Cold Water Supply
Turn off the cold water shut-off valve under your sink. Then open your kitchen faucet briefly to release pressure from the line. This prevents a mess when you disconnect or tap into the supply line.
Keep a small towel or bucket under the supply line during this step. Even with pressure released, residual water will drip.
Step 2: Install the RO Faucet (Rooter-Only Faucet).
This is often the most time-consuming step, especially if you need to drill a new hole. Check your sink deck for an unused soap dispenser hole or knockout first if one exists, use it.
If drilling is needed:
- Stainless steel: use a step drill bit or hole saw at low speed
- Granite or composite: use a carbide-tipped bit and keep the area wet while drilling
- Required hole size: 7/16 inch for most standard RO faucets
RO faucet installation steps:
- Feed the faucet base through the hole from the top
- Place the rubber gasket, then the flat washer, then the mounting nut from underneath
- Tighten the nut until the faucet does not rotate, do not overtighten on porcelain or granite
- Attach the faucet adapter to the faucet stem threads, hand-tighten, then add a half-turn with a wrench
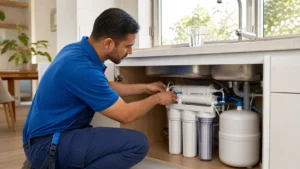
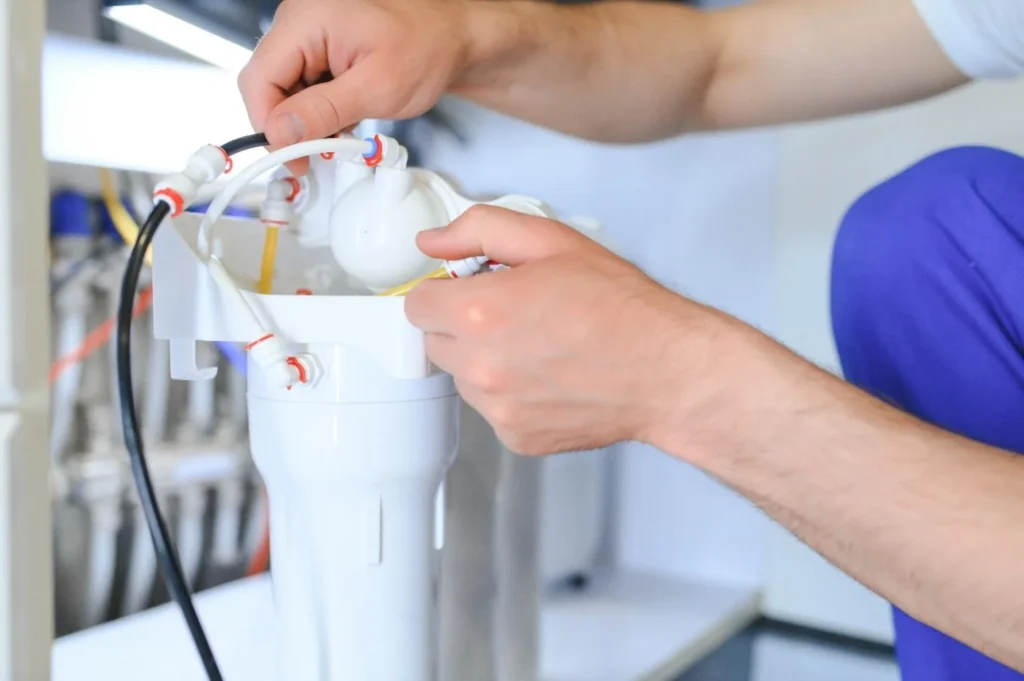
Step 3: Mount the RO Filter System
Position the RO unit on a side wall of the cabinet, typically the right wall with clear access for future filter changes.
- Leave at least 3–4 inches below the filter housings so canisters can drop for cartridge replacement
- Use the included bracket and screws, ensure the unit is level, as a tilted manifold creates uneven flow that strains fittings over time
- Place the storage tank toward the back of the cabinet; it does not have to be upright if space is limited
Mounting on the right wall leaves the left side clear for the storage tank and keeps tubing runs short, reducing kink risk.
Step 4: Connect to the Cold Water Supply Line
Two connection options exist. Choose based on your setup:
Option A: Angle Stop Adapter (Recommended)
Threads directly onto your existing cold water shut-off valve. More reliable, no piercing required.
- Disconnect existing supply line from shut-off valve
- Thread angle stop adapter onto valve
- Reconnect supply line to the top port
- Connect RO feed water tubing to the bottom port
Option B: Saddle Valve
Clamps onto the cold water pipe and self-pierces it. Works, but less reliable long-term. In California, some local codes restrict saddle valves on copper lines.
Cut the feed water tubing to length, leaving a few inches of slack. Push the tubing firmly into the inlet port until it seats fully, then give it a gentle tug to confirm it will not pull out.
Step 5: Install the Drain Saddle
The drain saddle connects to your sink drain pipe and carries the RO system’s wastewater away.
- Choose a location on the drain pipe above the P-trap (never below it)
- Mark the pipe and drill a 7/32-inch hole on one side only
- Position the saddle over the hole and tighten with even pressure on both sides
- Connect the wastewater tube from the RO system’s drain port to the saddle
Step 6: Connect the Storage Tank
Before connecting anything, check the storage tank’s air pressure with a low-pressure tire gauge on the Schrader valve at the bottom of the tank.
Correct pressure: 5–7 psi.
- Too high: tank will not fill completely
- Too low: tank fills slowly and drains too fast
After confirming pressure, connect the tank tube to the port labeled ‘TANK’ on the RO manifold. If the tank has a ball valve on its fitting, keep it closed during startup, open it once the system is running normally.
This is the most overlooked step in most RO installation guides. A tank shipped at wrong pressure is the most common cause of poor flow rate after a new install.
Step 7: Connect All Color-Coded Tubing & Flush the System
Your RO system’s tubing uses color coding. Connections vary by brand but follow this general pattern:
| Tube Color | Connection |
|---|---|
| Orange or Blue (Feed) | Cold water supply → RO inlet |
| Blue (Product) | RO system → RO faucet |
| Clear or White (Tank) | Storage tank → RO manifold tank port |
| Black or Yellow (Drain) | RO drain port → drain saddle |
Cut all tubes at a clean 90-degree angle before inserting into push-to-connect fittings. A diagonal cut is the leading cause of slow leaks on new installs.
Step 8: Flush the System Before Drinking Any Water
New filters contain carbon fines and manufacturing preservatives. They are harmless but affect taste and appearance. Flush them out properly:
- Slowly turn on the cold water supply valve
- Open the RO faucet and let water flow until it runs steady (10–15 minutes)
- Close the RO faucet and let the storage tank fill completely (4–10 hours for first fill)
- Once full, open the faucet and drain the tank completely
- Repeat the fill-and-drain cycle a second time
- After the second full drain, the water is ready to drink
Check every connection for leaks during the first fill cycle. A slow drip detected now costs nothing to fix. One discovered six months later may mean cabinet damage.
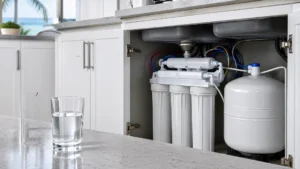
RO System Installation Diagram
A standard under-sink reverse osmosis system follows this flow path:

Each component in the flow path serves a specific role:
- Sediment pre-filter: Removes sand, silt, and sediment that would clog or shorten membrane life
- Carbon block pre-filter: Removes chlorine and chloramines (critical for Tracy, CA municipal water which uses chloramines)
- RO membrane: The core filter removes dissolved solids, heavy metals, PFAS, fluoride, nitrates
- Post-filter (polishing carbon): Final taste and odor polish before water reaches the faucet
- Storage tank: Holds filtered water under light air pressure for fast delivery on demand
How Long Does Installation Take?
| Task | Time Estimate |
|---|---|
| Physical installation (all 7 steps) | 45–60 minutes |
| First storage tank fill | 4–10 hours (leave overnight) |
| First flush cycle | 10–15 minutes |
| Second fill + drain cycle | 4–10 hours |
| Ready to drink | After second drain cycle |
If faucet drilling is required on a granite or cast iron sink, add 20–30 minutes. Professional installation by a licensed plumber typically takes 1–2 hours including testing and a full leak check.
When to Hire a Plumber to Install a Reverse Osmosis System
Self-installation may make more financial and logistical sense than calling a professional to complete under-sink installations in most instances. But in certain circumstances, hiring professional installers might be wiser.
Consider professional RO system installation if:
- Your under-sink shut-off valve is old, corroded, or will not turn
- You want to connect the RO system to your refrigerator or ice maker
- Your water pressure is below 40 psi and needs a booster pump
- You have a non-standard sink (farmhouse, cast iron) where drilling is risky
- You are a renter or property manager and want install reverse osmosis water filter done to a documented standard
A licensed installer typically completes the job in one to two hours and can handle code compliance for properties. If you would rather have it done right the first time without the stress, that is a completely reasonable choice.
What About Water Quality in Tracy, CA?
Tracy’s water supply comes from a combination of surface water from the Delta and groundwater. Municipal treatment typically uses chloramines rather than chlorine, which requires a specific carbon block filter for effective removal. A standard reverse osmosis water filter handles chloramines well, but only if the pre-filter cartridges are rated for chloramine removal.
If you are concerned about PFAS contamination, which is a growing issue in parts of California, a properly maintained RO system can address that too. Read more in our detailed guide, Does Reverse Osmosis Remove PFAS.
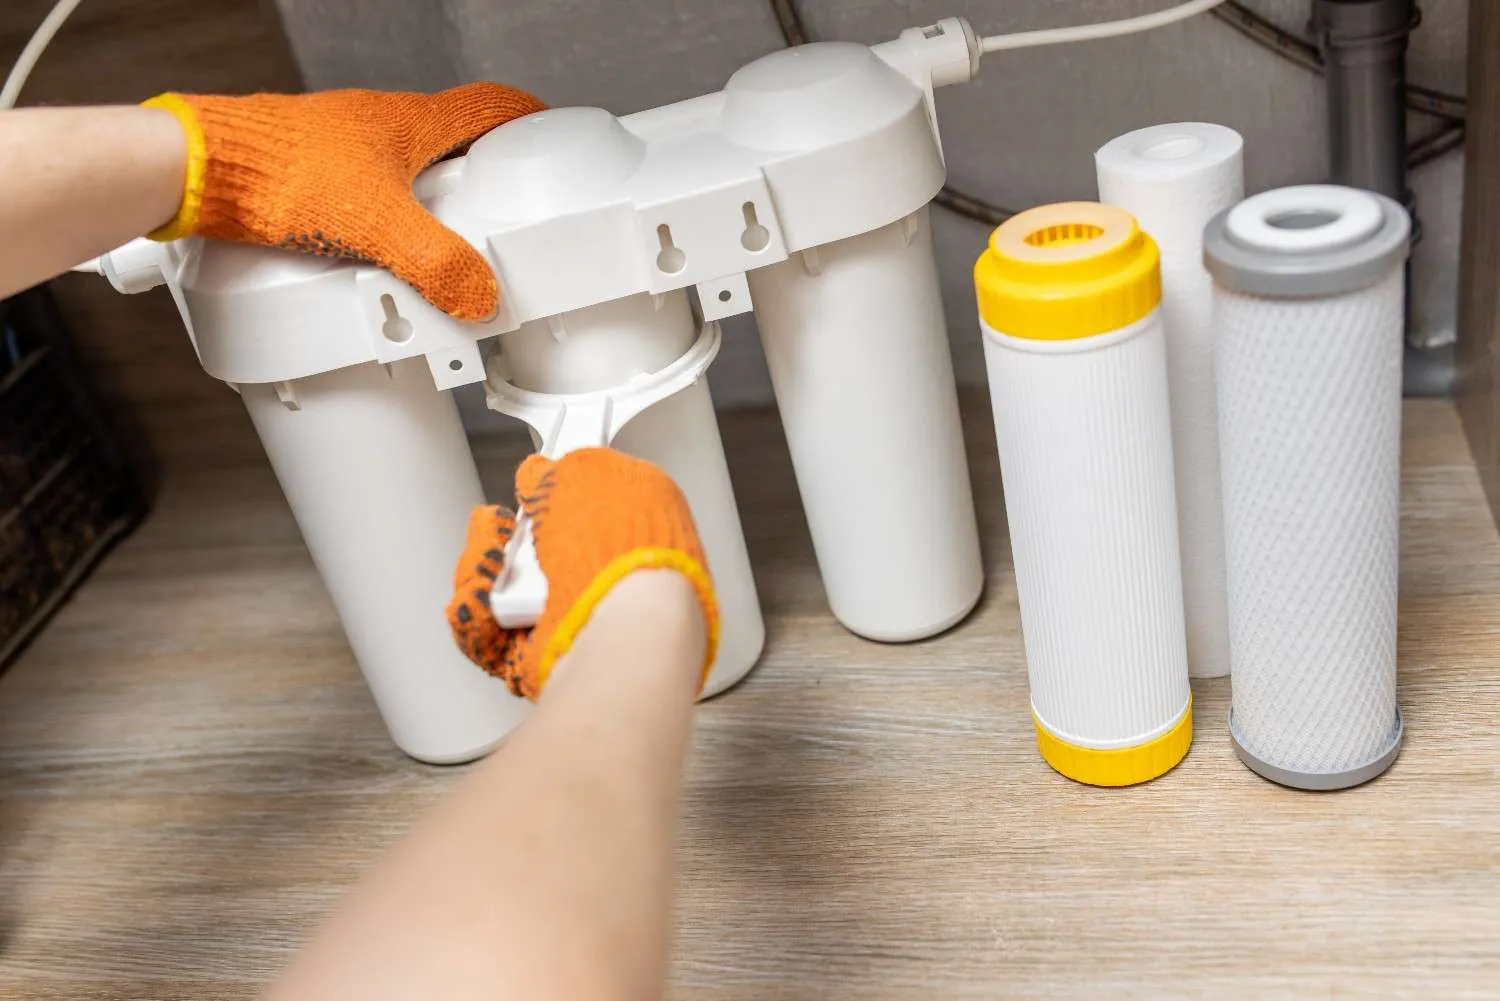
Maintenance: What to Expect After Installation
Installing your RO filter setup is only step one in keeping water clean; to maintain clean drinking water quality follow this general schedule:
- Sediment pre-filter: Replace every 6 to 12 months
- Carbon block pre-filter: Replace every 6 to 12 months
- RO membrane: Replace every 1 to 2 years depending on water quality
- Post-filter (polishing carbon): Replace every 12 months
- Tank air pressure: Check annually and adjust to 5 to 7 psi if needed
If your flow rate drops significantly and filters have been recently changed, check the tank pressure first. It is the most overlooked cause of poor RO performance and takes less than two minutes to diagnose.
Common DIY Mistakes to Avoid
Even experienced DIYers run into these:
- Not checking water pressure first. Low pressure means slow production. High pressure above 80 psi can shorten membrane life.
- Using Teflon tape on plastic push-fit fittings. This actually causes leaks, not prevents them.
- Skipping the flush cycles. The first two tankful should always go down the drain.
- Mounting the unit too high in the cabinet. Leave clearance for filter changes or you will be removing the whole unit every six months.
- Running the drain line with too many bends. Keep it as straight and downhill as possible.
Conclusion
That said, if anything in this guide gives you pause, or if your under-sink setup is older or unusual, having a professional handle the RO system installation removes all guesswork and usually costs less than you would expect. RO Water Filter System provides professional installation throughout Tracy, CA and nearby areas.
No matter if it is already installed and needs proper connection or you require help selecting and install reverse osmosis water filter, our team is on hand to get it done correctly. Reach out, today or schedule your installation or ask any quick questions before getting underway; fresh drinking water should never be hard to obtain!
FAQs
How long does it take to install reverse osmosis water filter?
For a first-time DIYer with a standard under-sink setup, expect two to three hours for the physical installation. After that, allow 4 to 10 hours for the storage tank to fill completely before you do your initial flush cycle.
Do I need to call a plumber to install a reverse osmosis system?
Not necessarily. Most homeowners with basic tool skills can handle the job themselves. However, if your cold water shut-off valve is corroded, your water pressure is very low, or you want the RO line extended to a refrigerator or ice maker, professional help is worth it and usually saves time.
How can I find a reliable plumber to install reverse osmosis system in my home?
To ensure your drinking water is clean and safe, hiring a professional plumber to install reverse osmosis system is crucial. A qualified plumber will correctly connect the system to your water supply, check for leaks, and ensure the filters and membrane are properly installed for optimal performance.
What is the right water pressure for a reverse osmosis system to work properly?
The ideal feed water pressure is between 50 and 80 psi. Systems will still function between 40 and 50 psi but produce water more slowly. Below 40 psi, you may need a permeate or booster pump to maintain adequate flow from the RO faucet and to fill the storage tank in a reasonable time.
How to get RO water at home easily?
To get RO water at home, you can install a reverse osmosis (RO) water filtration system under your kitchen sink or use a countertop RO unit. These systems push water through a semi-permeable membrane that removes impurities like dissolved salts, chemicals, and contaminants.